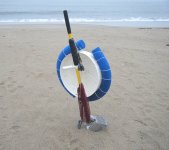
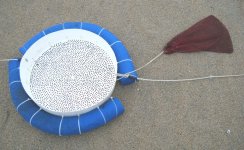
This sifter has been used for many years to recover thousands of targets!
Heavy zip ties are the way to go!! They hold up well!!
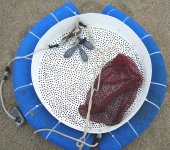
The white tub can be the bottom part of a 50 gallon barrel with lotsa holes just small enough that a .22 cal bullet can't fall through.
Allow about 1/2" of space from the holes to the curve at the side for maximum strength.
Another post from he past-------------------
Mar 3, 2012
A Hunter Friend from Australia asked for more details of my sifter and this AM I thought I would oblige with a short photo essay illustrating every point I considered when I built mine.
My desire was for a highly functional sifter that cost as little as possible and I built several over the years using metal screens, inner-tubes, etc.
They all worked, but I couldn't use my coil to determine if I had the target in the pile of stone etc. dumped from my scoop and as I got older, with eyes to match, I wasn't able to use a pin-pointer to find the tiny targets.
While on a dump run one day I saw several tubs some commercial fisherman had tossed into the bin there for such things. They were sturdy and could be easily cut to the size I needed and were free!
The one I chose is 20" in diameter, (I cut it to) 5" deep and handles the scoop load nicely. I wouldn't recommend one much smaller unless you are hunting only in sand. I prefer the white bottom for visibility and that it be flat to allow for easy sorting through the debris.
A sifter larger than 24" will tend to be too large in must hunting situations,
Using the idea of drilling hundreds of small holes, borrowed from KaptKosmic, I proceeded to build the sifter illustrated here.
My experience had been that inner tubes as floats were a pain in that they required replacing from time to time and were usually flat when I needed them.
Solution=Floaties which I also found at the dump and later at Walmart for less than $5.00. The larger the diameter the better. On my sifter I used only one which lasted a couple of seasons and then started to shred apart.
The blue floats I am currently using were salvaged from a floating pool chair I came across at the dump. They are the perfect size to keep the sifter floating high in the water.
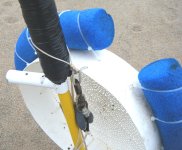
In the pics you will notice I placed the holes for mounting the Floaty low on the sides to keep the bottom high in the water. This works out well when in the shallows and makes locating targets easier too. I started out lacing a cord through the holes to secure the Floaties, but graduated to all plastic, electrical quick ties as a fast, inexpensive method.
The bottom curves as it reaches the wall of the sifter and allows dragging a target up the side when wearing gloves so that I can pinch it between my fingers without struggling to grasp it as it lays flat on the bottom. (Harder to do in rough water where sometimes I am able to cause the small target to lift off the bottom by a short brisk push down on the sifter bottom. The water jetting upward through the holes will often lift the target enough to grab it.)
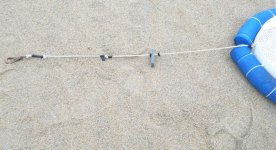
The tow line is anchored into the side via two holes through the side for a strong attachment that has worked well for several years now.
There is a loop in the draw-string to the nylon mesh trash-bag where it is tied on for me to slip over the scoop handle for easy transporting on my shoulder to and from the water.
The draw-string is left over a foot long to provide distance from the sifter as the larger finds contained there-in, all smaller finds are secured in my waist pouch, will interfere with using the coil to locate finds if it is too close.
The tow-line has a brass snap hook (Notice in pics 2 and 3 how this hook is used to secure the weights etc for travel.) I dug up one day that attaches to a stainless loop of heavy wire on my belt at the center of my back. This keeps the tow-line out of my way most of the time.
This line used to be shorter, but then the sifter was in my way too often so I made it longer and placed a 1Lb.weight on it to keep tension on it when I step toward the sifter.
The sifter is now out of the way most of the time and I don't find myself chasing it with my scoop-load in windy conditions or when the current is strong enough to push the sifter away as I step toward it.
Tension on the drag-line with the 3 Lbs. of weight at the end keeps the whole rig under control most of the time and allows me to concentrate on the target and not have to be battling the sifter as water conditions change.
I think I have covered all pertinent details here, but let me know if there may be any I missed.
GL&HH,
CJ
Heavy zip ties are the way to go!! They hold up well!!
The white tub can be the bottom part of a 50 gallon barrel with lotsa holes just small enough that a .22 cal bullet can't fall through.
Allow about 1/2" of space from the holes to the curve at the side for maximum strength.
Another post from he past-------------------
Mar 3, 2012
Attachments


