jeff_fl
New Member
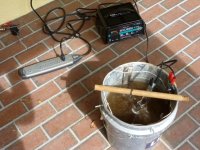
In my first greetings post, I mentioned that I bought a battery charger that did not work very well. It is a Stanley from Lowes. It is very finicky about how solid the connections are, I guess. It beeps at me constantly and won't come on. I decided to buy another one that is not computer controlled. I got it from autozone tonight. It worked right out of the box the way I wanted it to. It's running on 50 amp engine start mode right now and bubbling like crazy. I probably won't leave it on that setting very long. I'll kick it down to 10 amp and let it run. "When" the finicky Stanley decided to work, it ran at about 14 or 15 amps in engine start mode and the bubbles really showed up. The water however was pretty warm when I let it run overnight. So, I can just imagine what 50 amps would do for any period of time. I would not run it on that setting and leave the house or go to bed. At least not yet until maybe I read up more and get more experience.
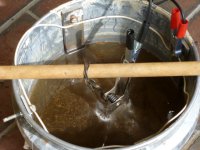
Attached are photos of my current electrolysis setup. I bought a 1/4" thick x 48" long x I think 1 1/2 or 1 1/4" wide chunk of metal at home depot. I cut it into (4) 12" lengths and drilled a hole in each to fasten to the bucket. I guess my setup looks a little different than most in that I connect the wires on the inside of the bucket. I think that makes more sense and a better connection. I don't see any issue with it being near the water and in fact might be safer since you couldn't accidentally touch the leads by brushing into the outside of the bucket. I use a big utility clamp to hold the piece in place from beneath the crossbar piece of wood. I just connect the little negative battery charger clamp to that clamp above the water. And of course connect the red/hot lead to one of the bolts on the inside of the bucket. So far, working great with the new charger which by the way is a Schumaker SE-5212A, again from Autozone. I looked into buying some graphite pieces instead of the steel to use as the sacrificial anode, but graphite is pretty expensive and this steel was readily available. So, I'm using it this way for now. I have a bad habbit of loosing interest in projects like this. So, I'll see how my love of metal detecting goes before I sink too much money into it.
Hope this helps someone who might need to do this. By the way; there was a very nice pre-made round metal rod from Home Depot right beside the rebar and similar in price. They were pieces about 15" long. What I liked about them in addition to being pre-cut was that they had holes pre-drilled through them. The holes were a little small but could be easily made larger for a bigger bolt if necessary. They had a little coating of black stuff that could be easily wired off of them. One end is pointy and one end flat. I was very tempted to buy four of those instead. Just an fyi....